

3.2 Understanding How Cameras Work
3.2.3 Camera Exposure Settings
 |
Camera Settings
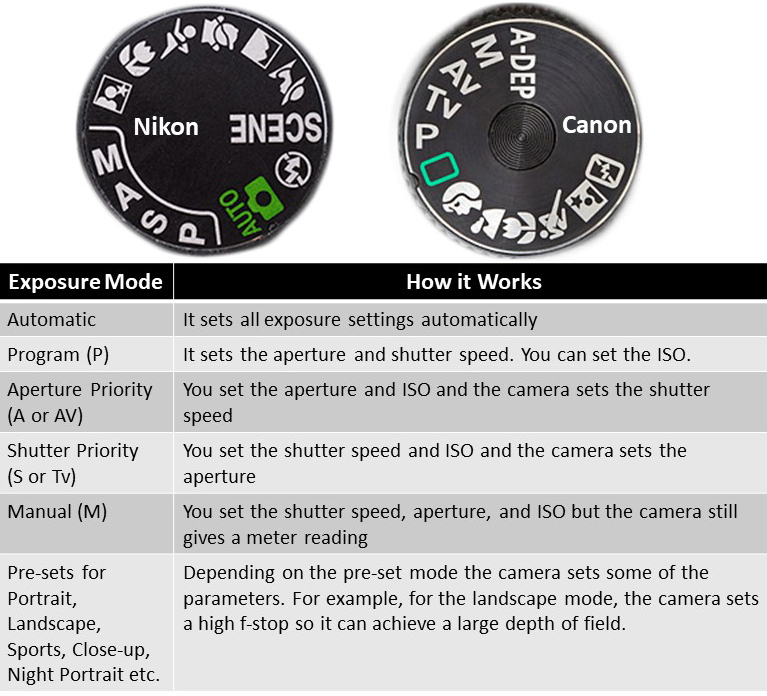
Depending on the camera you use, there will be different ways to change the exposure settings. What is important to remember is that most digital cameras have some quite standard exposure modes which affect how the shutter speed, f-stops, and ISO are chosen and/or if can be changed. The image above shows the camera exposure dials you will encounter on a Nikon (left) and a Canon (right) camera. They are very much the same, apart from the Aperture Priority Mode which is signified by an A (Nikon) and an Av (Canon), and the Shutter Priority mode, signified by an S (Nikon) and a Tv (Canon).The Automatic mode, although it makes photographing rather easy as it sets all exposure settings automatically, it is not a suitable mode for computational imaging applications as you will typically need images with stable settings. Given that in the automatic mode changes in lighting or the position of the camera may also change the f-stops and shutter speed, the resulted dataset will consist of images of different settings, which is not ideal for many applications (e.g. Reflectance Transformation Imaging).
On the other hand, the Manual mode, might make it more difficult to handle especially if you don't have much experience in digital photography. Given that all settings are set by the user, the manual mode requires trial and (mostly) error. Therefore, if you are determined to use the manual mode for a computational imaging application, since this will give you the most flexibility, it will be good to spend some time practicing in similar conditions and with similar objects before starting capturing the actual objects. The benefit of this mode is that you can be consistent throughout the capturing process, since all settings will stay the same across multiple exposures.
The Aperture Priority mode is probably the most preferred mode and the easiest to handle as it lets you set the preferred aperture, while allowing the camera to calculate the exposure and automatically set the shutter speed. Therefore, if there is too much (or too little) light in the scene, the camera will adjust the shutter speed, so the images is accurately exposed. Since in this mode you set the aperture, you can also define the depth of field, thus deciding how much/ which part of your subject will be in sharp focus.
The Shutter Priority mode is similar to the Aperture Priority mode, although in this case, you can set the shutter speed and the camera automatically calculates the aperture based on the amount of light that passes through the lens. This is best used when motion is involved in the picture by either freezing it or blurring it. Also, since the camera sets the aperture, there is no control over the depth of field.
The Program mode sets automatically the aperture and the shutter speed based on the intensity of light that passes through the lens. Although you can still set the ISO, it does not give much control over the exposure. Therefore, it is better to be used with caution.
Depending on the make and model of the camera you use, there will also be some special exposure modes for which the camera automatically sets all the required parameters. For example, for the landscape mode, the camera sets a high f-stop so it can achieve a large depth of field, whereas for the portrait mode it sets the lowest possible f-stop to achieve a shallow depth of field. In most cases, these will not be suitable for a computational imaging application, but it is advised to look at the camera's manual to check the exact modes and settings.
 |
|
Exposure Modes (Click to enlarge the figure) |
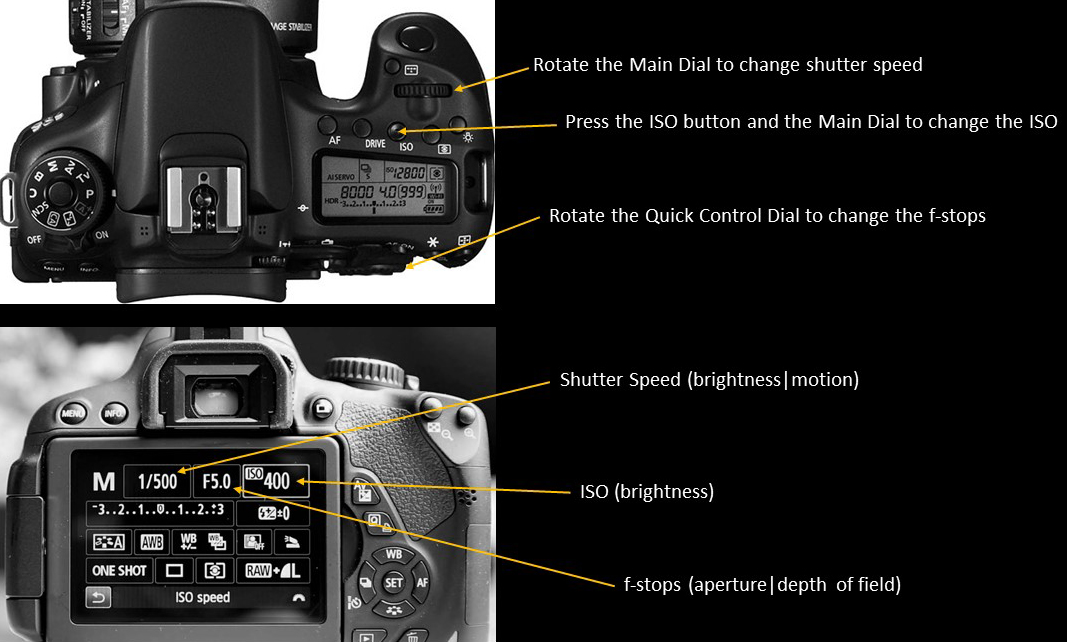
Depending on the camera you use, the f-stops, the shutter speed, and the ISO will have to be set in different ways. In the image below you see how to set these values for a Canon DSLR. In most cases, these can also be set via a touch screen/ viewfinder (if available). If your camera supports a live view mode, i.e. if you can connect it via a cable or wirelessly to a large monitor, e.g. laptop, this will give you more flexibility, as on the one hand you can see real time what the camera sees, while on the other, you can change the settings directly by the connected device. This also has the benefit of not touching the camera during capturing, thus avoiding the introduction of movement, which in many cases can ruin your dataset.
 |
|
Camera Exposure Settings Exposure Modes (Click to enlarge the figure) |